The Turkish Get Ups are by far one of the best exercises that carries over between all populations.
Maybe you’re the person who is a body builder or hits the machines at the gym and you move in single planes of movements or you’re the Yogi that can twist and bend all over the place, but lack raw strength and power. In either situation, a Turkish get up is the exercise for you. As you will see, the TGU requires the combination of flexibility, power, strength, and balance. The people who need mobility and flexibility can gain these benefits through a TGU and for the person who needs strength and power, you can gain the benefits by loading up your TGUwith a nice and heavy kettlebell. For the person who feels like they lack coordination and being able to use all of their body parts independently as well as together will help improve the planning and thought process required to gain coordination.
Note: Kettlebells are the best mode for resistance, but using a bumper plate and holding it like a tray with a flat hand, then you can work your arm mobility and stability in various ways. Dumbbells will allow you to go heavier because it does not require as much shoulder stability and balance. Going unweighted allows the athlete to work through each phase as a mobility concept vs working through strength and power.
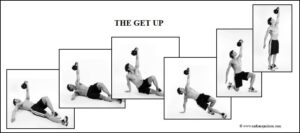
Phase 1: The Sit Up
In this first phase of the TGU, we have the sit up where you go from your back and curl up onto one hip and one hand with the weight of the kettlebell in the other hand sticking straight up to the ceiling from start to finish.
Phase 2: The Bridge
Phase 2 involves moving from a sitting position into a bridge on one arm and leg. Can you see the balance and mobility required here? You need the strength of the glutes to get you off the ground, the stability of the shoulder to hold the weight overhead, and the mobility of the spine to twist so you can keep a straight line through the arms.
Phase 3: The Kick Through
The kick-through is tricky and is arguably the most complex and difficult movement out of all of the phases. The kick-through takes your straight leg and swings it through the gap made by your foot and hand to then bring you to a kneeling position.
Phase 4: The Lunge
After you get set into a ½ kneeling position, you then move into a standing position via a lunge maneuver. The lunge here is what really challenges the leg strength, the balance of the weight in the hand and the overall stability of the body with a weight that is only loaded on one side of the body.
Phase 5: Standing to Reverse
After you get into a standing position with your arm straight overhead, the next step is to reverse your whole process back to laying on your back and onto the floor. This requires more skill and balance than the first 4 phases. If you need to just work on Phase 1-4 and hold on the reversal, then feel free to fine tune those movements or work yourself randomly from phase 1-2-3-2-3-1 and that way you can work the reverse directions without having to piece it all together at once.